2019 03 Update* - Superior grounded the XP382 and XP400 engines due to several broken and fractured crankshafts. They reimbursed me for the engine minus parts that I kept and added labor costs after I shipped it back to them. I retained the cold air sump, flywheel, SDS EI/EFI. I ordered a Titan 370 to replace it since I needed a ~200 HP engine to match the prop I'd already bought.
I didn't get to do the build school for the Titan engine but these photos are a reminder of a valued experience. Traveling to Canada to build the engine and running it was an adventure and mostly fun. The journey to do it is memorable and is worthy of the OSH Perseverance Award.
---------------------------------------------------------------------
The hunt for an engine began about the time I started building. I consulted with other builders and several vendors were at the top of the list after I'd given up on finding a decent used engine. Aerosport Power and Superior have a great reputation of standing behind their products. I also paid attention to one of my neighbors trials and tribulations of scrounging for an engine for his RV. His third used engine was finally "good enough" with the first two turning out to be junk.
Darren at Aerosport Power advised I could get a deal during Oshkosh 2017, so I purchased the XP382 and the build school was included as part of their OSH special. They scheduled the build during Thanksgiving week, which was their last class of the year. I booked a flight from DFW to Vancouver BC and a hop to Kamloops. The flight out of Vancouver was delayed several times and then disappeared off the board. The agents advised that the flights there had been cancelled due to high winds. I went to the car rental area and was advised I'd need studded snow tires since I'd be going through a mountain pass to get to Kamloops. My app showed it would be about a 3 or 4 hour drive. Soon I was in the mountains and huge snow flakes were falling and traffic came to a stop. No cell service. Not much on the car's radio either. Occasionally traffic would pull forward a few car lengths and stop again. There were some wrecked vehicles in a few places in the median. After 6 hours and close to midnight, got to the hotel in Kamloops. When I turned on the television, I realized that the highway I drove on was the notorious Coquihalla "Highway through Hell" from the documentary on Discovery. Not only that but a "Pineapple Express" storm was rolling in. Yay. An "adventure"! My wife had declined coming with me. She seems to have a sense when to stay home.
The next morning, I headed to the airport and got a call from Darren wondering where I was as I was a few minutes late. He gave me directions and he'd be waiting for me. I met Darren and several other folks there and they asked how I got to Kamloops and were somewhat astounded when I said "I drove." I confirmed that I hadn't planned on having this much fun. Darren gave me a tour and we settled into his work area.
 |
| Parts painted and neatly laid out. A 360 is on a cart in the queue behind mine. Contact points were masked off and left unpainted where the case bolts tighten. Heads are ported and polished. I kind of wish I'd had the heads finished like the ones behind with black barrels and unpainted heads. |
 |
| When I saw this I initially gasped, but you'll notice those are soft aluminum jaws in the vice and did not mark up the crank. A plastic bag was put over the flange, greased up and then we heated the seal and slipped it over the flange and it popped right on. This is a counter balanced crank. The weights only go in one way. |
 |
| We installed the rod bearings. |
 |
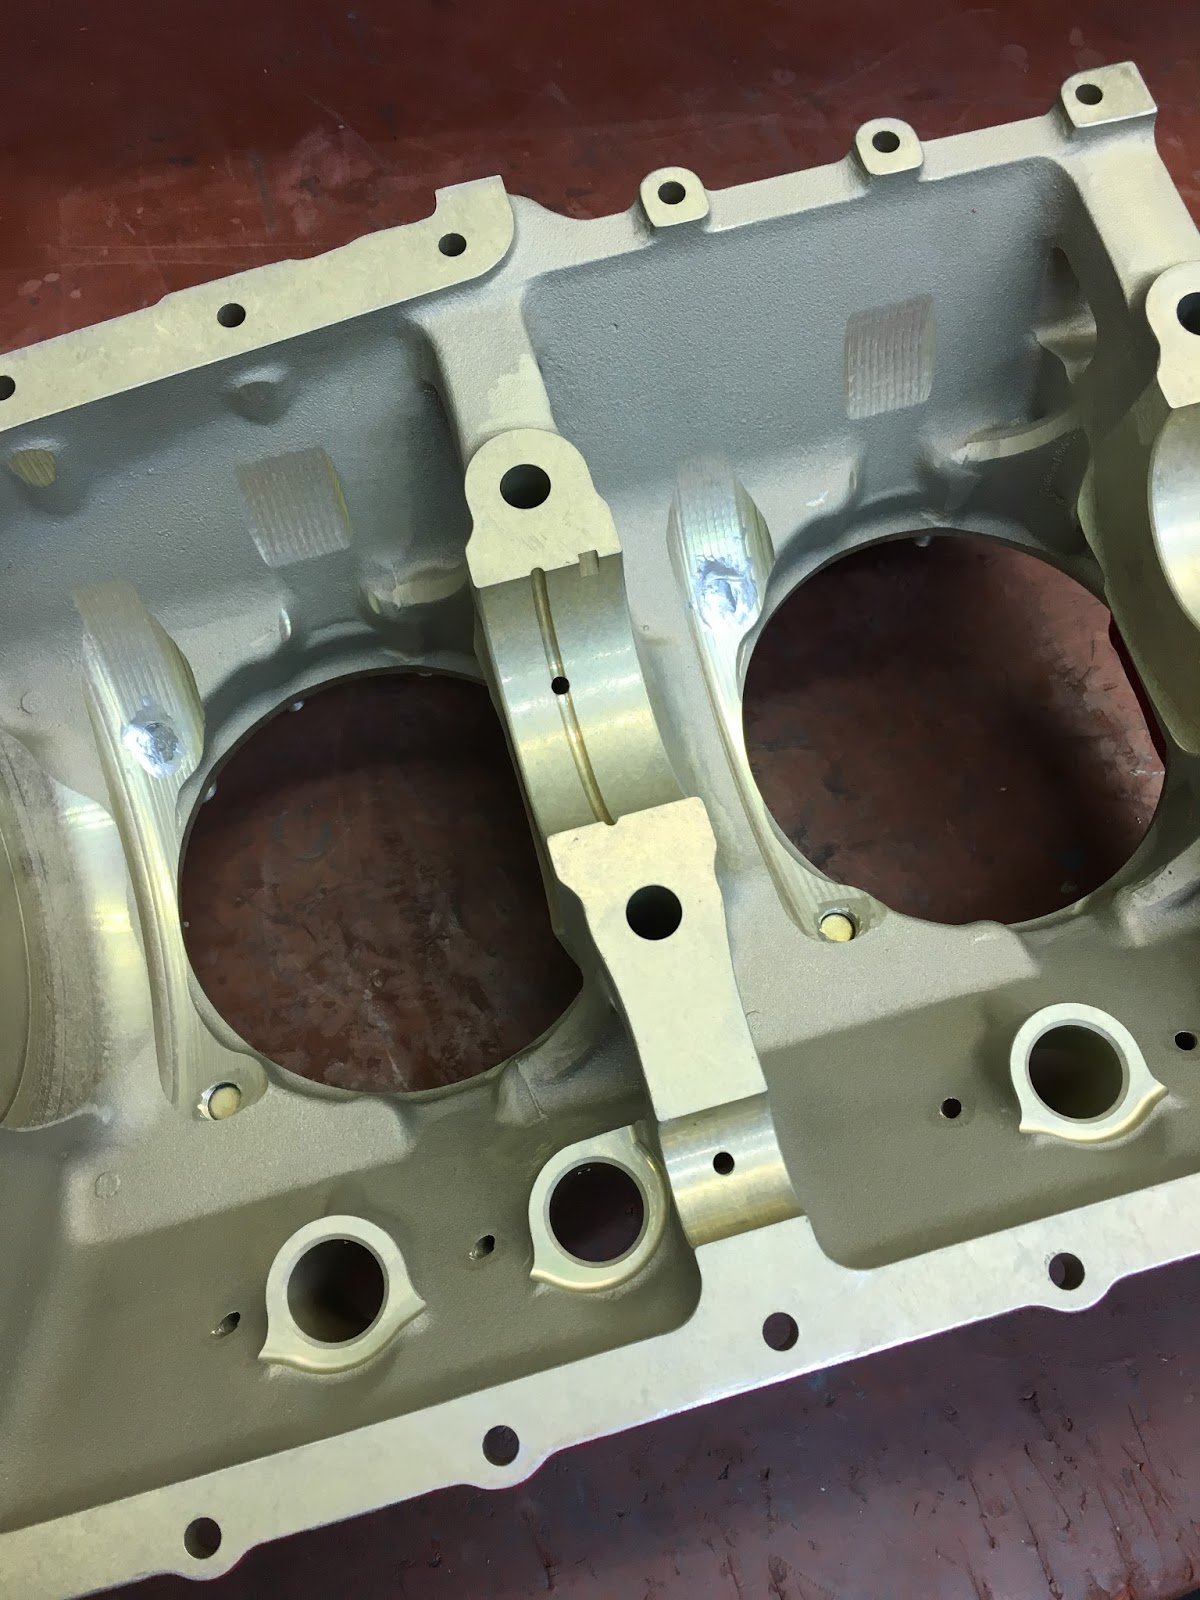
| The case accommodates roller lifters. Also, the holes where the through bolts pass are machined to accommodate O-rings. The case is also machined for the longer stroke. |
 |
| Holes are drilled to accommodate oil flow back into the sump for inverted flight. Nice to have if I swap the engine to something else some day. |
 |
| The two additional drill holes are visible. |
 |
| Nozzles aka "squirters" will be installed that sprays oil into the bottom of the piston. |
 |
| The crank, bearings, seals, silk thread, cam, roller lifters were installed. Then some cardboard inserts held the upright rods in place when the other case half was put in place. There are bolts installed and wired that keep the rollers in place. |
 |
| The push rods are checked for straightness. |
 |
| Sump and oil pump is installed. Push rods, tubes, rockers are installed and valve lash is checked. Only one push rod was one step to long (valve lash was under minimum clearance). The shop has plenty of push rods in stock of various lengths. |
 |
| Hall effect sensors installed. Accessory case, oil pump, sump, coil mounts, various oil galley plugs and fittings are installed. Install the alternator bracket before installing the Hall effect mount. |
 |
| The SDS dual fuel pump assembly. |
 |
| Ready to go onto the test stand after installing the injectors, fuel block, pipes. The coils were strapped to the engine mount to avoid damage and make it easier to spot leaks. They used their oil adapter instead of my 90 degree adapter. The SDS system has a cold temp sensor in one of the cylinder intake ports. |
 |
| "That's a lot of wires" was a common comment from the mechanics familiar with the traditional mags and Bendix systems. It took a bit longer to connect everything but next time will go faster since they'll re-use some of the SDS harness. Fuel pressure regulator was set to 40 .lbs with engine not running. Post shut down has fewer steps than a bendix/mag system. Don't have to re-check the mag timing, balance nozzles. |
 |
| After getting the master ECU selected and electronic mixture set it started fine. Pulp mill stack is in the background. |
 |
| Test panel gauges. The control box for my SDS system is setting on top of the panel. |
 |
| Initially, WOT was around 2750 and after running for awhile consistently came up to 2800 RPM. About 50-100 more RPM than the 200 HP engines with the same prop. |
 |
| Temporary mount for the ECU. A fuel pump is below it. |
Cranked up after tweaking the electronic mixture knob a little richer.
Engine running at 2800 RPM and bypass fuel is visible going back into the fuel tank. Fuel pressure was set to 40 .lbs without the engine running.