This is a good story and lesson learned about doing modifications.
Bill James Chronicles - My buddies are still building
^This link seems to be occasionally broken. Google cache still has this:
http://webcache.googleusercontent.com/search?q=cache:rp36J3GVgu0J:v2.ez.org/ezcron.htm+&cd=1&hl=en&ct=clnk&gl=us
Friday, September 29, 2017
Google Maps Cozy Group
Link to Google Cozy Builder Database:
Must be a member.
Thursday, September 28, 2017
Chapter 23 Engine Installation - Aerosport Power built Superior XP-382
The engine should be here in December 2017 after the 3 day build school in Kamloops.
Wildcat XP-382
minus mags (10 lbs.)
minus mechanical fuel pump
minus carb or mechanical fuel injection
+electronic dual ignition (SDS)
+electronic fuel injection (SDS)
+pad mount & belt driven Planepower alternators
+cold air sump
+roller cam
Superior Millennium Steel Cylinders, SDS Electronic Fuel Injection and High Energy Ignition System with Dual ECU, Harness, Spark Plugs, Plane Power 60 Amp and 30 Amp Internally Regulated Alternators, Sky-Tec High Torque Inline Starter, Roller Camshaft and Lifters, Superior Cold Air Horizontal Induction Sump, Connecting Rods, Balanced Hollow Crankshaft, Dynafocal Type 1 or Conical Crankcase, Ring Gear, Inner Cylinder Baffles, Dipstick and Tube, 90 Degree Spin on Oil Filter Adapter, Prop Governor Adapter and Vacuum Pump Adapter Housing. Port and Polish of the Cylinders, Standard engine color choice
XP-382 Manual < Click Here
Wednesday, September 27, 2017
Chapter 15 Firewall
Engine mount holes are drilled.

The Andair Gascolator compatible with high pressure fuel injection:
https://www.youtube.com/watch?v=m_EzDpnRnaE

The Andair Gascolator compatible with high pressure fuel injection:
https://www.youtube.com/watch?v=m_EzDpnRnaE
Tuesday, September 26, 2017
M Drawings
Originally, it appears there were 35 sheets but they were later formatted onto 18 sheets. Additionally, some of the M Drawings are now posted on the Cozy Builder site. There are updates to multiple templates. Updated plans should have a "G" template for setting the canard incidence. The rib R57 for the strake is updated with 1/2" loft.
Links here:
Cozy Builder CAD files - updated M drawings
http://www.cozybuilders.org/cad_files/Cozy_MKIV_M-Sup_1.2_Draft.pdf
New Sheet Contents
1 Right, Top Instrument Panel & Top Seatback
2 Left, Top Instrument Panel & Bottom Seatback
2 Right, Bottom Instrument Panel, & M-23 & M-24 Match Pieces
3 Right Bulkheads F-22 and F-28
4 Left Landing Gear 2
4 Left Landing Gear 1
5 Right, Top Firewall
5 Right, Bottom Firewall
8 Fuselage Cross Section - FS 105 to FS 124
6 Fuselage Cross Section - FS 2 to FS 20
6 Fuselage Cross Section - FS 20 to FS 35
7 Fuselage Cross Section - FS 35 to FS 52
7 Fuselage Cross Section - FS 52 to FS 69
7 Fuselage Cross Section - FS 69 to FS 86
8 Fuselage Cross Section - FS 86 to FS 105
9 NACA Templet, Top and Bottom Fuselage Contour Templets
10 Canard Templets
10 Canard Elevator Templets, Vortilon Templets
11 Nose Sections
12 Wing Jig Templets #3, #4, #5 Match Pieces, CS Spar Templets & Winglet Trim Templet
12 Wing Jig Templets #1, #2, #3 & #4 Match Pieces, Rudder Conduit Pattern, & Winglet Root Match Templet
12 Wing Jig Templets #1, #2, #3 & #4 Match Pieces, Rudder Conduit Pattern, Winglet root Match Templet & Winglet Tip Templet
13 Wing Templets BL 67.5, 118.25 & 169 Match Pieces & Straight Templet
13 Wing Templets BL 31, 67.5 & 118.25 Match Pieces & Aileron and Torque Tube Templets
14 Fuel Tank Rib R-33, R-57 Match Pieces & Winglet Bottom Tip Templet
15 Canopy Frame Templets FS 41, 50, 50 & 70 & Canopy Brace
11 Speed Brake Details
16 Engine Mount Front and Side Views
17 Engine Baffles
18 Engine Baffles
18 Carburetor Filter Box
Chapter 03 Education
Chapter 3 is 19 pages long. It includes a list of basic required tools, recommended tools, items used occasionally & can be borrowed.
Some tools can be made such as sanding blocks, long straight edge, epoxy balance, hot wire cutter, and jig table.
Materials are covered. The types of fiberglass (BID & UNI), epoxy, foam.
Construction, repair and inspection methods are explained.
Water lines and Butt lines are explained.
----------------------------
The epoxy to glass ratio by weight is typically 1:1. Wetting multiple layers of glass between layers of plastic on your work bench is often better (quicker and easier to handle) than trying to do one layer at a time. Exceptions might be for long/hard to handle thin layers of glass.
Typically EZPoxy is used by many builders for the tanks even if they're using MGS for the rest of the structure.
Working time/pot life is greatly affected by ambient temperature. Warm epoxy has a lower viscosity and wets better. Warm epoxy can/will exotherm if it's heat isn't dissipated by stirring or spreading out. Fast hardener is more prone to exotherm than slow. Several layups (such as the winglet attachment) in the project have many layers and can easily exotherm if the temperature is high and fast hardener is used.
In cold temps when using epoxy, avoid using heat that produces CO2. Keep parts above the dew point. Use peel ply to avoid amine blush or amine bloom. Use heat (lamps or electric blankets) to help provide heat. See Gary Hunter's presentation on Epoxy.
 |
| Wetting multiple layers of glass between plastic is probably faster and easier than doing one at a time and is easier to handle. A strip of peel ply can be added to this to help provide some additional support to keep the glass from acting like a wet noodle. This is a photo of 5 layers of 3" x 22" BID, weighs about 2.5 .oz and uses an equal amount of epoxy in weight. A chart is handy with resin/hardener ratios. MGS has a green tint. EZPoxy has an amber tint. West systems is clear. |
 |
| A belt sander made fast work of removing 3 layers of BID on the internal trailing edge of the cowl. I'd drilled holes for cam locs to close to the trailing edge (plans say 1.25") but the V angle was to shallow for the camlocs to fit there so will move them in a quarter of an inch. The camlocs need consistent thickness and the trailing edge needs to have a nice flat surface so just repairing each hole would have been tedious. It took a few minutes to sand off the mistake and put new BID on for another try. |
Chapter 02 Section I - Bill of Materials
Chapter 2 is 5 pages long. It lists the parts and main suppliers. Below is a link to the ACS site's PDF formatted parts list.
The challenge here is with various modifications, some parts won't be needed. Some parts may not be available but alternative or better parts are available.
It may make sense to purchase enough fiberglass to complete the project, but order epoxy as needed. Occasionally there can be delivery issues with items such as MGS epoxy. Despite expiration dates on some products, if properly stored will remain useable beyond the expiration dates. See Gary Hunter's EAA presentation on Epoxy.
Shipping charges can become significant for large items. Sometimes the shipping is more than the cost of the item. It may be worthwhile to plan a trip to a distributor. Aircraft Spruce owns Aeroperformance so items can be "store transfers" to those store locations to save on shipping. * Update...I'm hearing they don't do this anymore unfortunately.
Purchasing some components such as the wing core foam that is already CNC cut, adds minimal cost but is likely to improve the quality of the finished project.
Occasionally projects are orphaned/abandoned for a variety of reasons. These provide an opportunity to pick up finished components for just the cost of materials. Buyer beware though.
Kit list from Aircraft Spruce
ACS redesigned their web page once and removed this list and added it back. Here's a copy if it disappears again:
Copy of Aircraft Spruce Kit List
 |
| Labeling the boxes of foam with part number, description, size, chapters and quantity needed was helpful. |
Chapter 01 Description and Introduction
Chapter 1 is two pages long with a detailed description of the capacity, controls, flight characteristics, design and much other information. Major sections are:
Description: There are 7 paragraphs describing the Cozy IV.
Introduction: There are 8 paragraphs.
Building Sequence: Advises that while waiting for parts, or epoxy to cure, other chapters can be worked on.
Building Time: Estimate is 2500 hours total time. (This was before the Internet and a bazillion mods that you'll want to implement).
Questions: Suggests resources if you have questions.
Perspective: "If you modify the airplane and then ask us if your modification will work, we cannot give you an answer without conducting the appropriate tests....."
FAA Licensing procedures: (Note the procedures may change).
One paragraph advises that that the non-completion rate of homebuilt aircraft is 80%.
Updates/corrections to plans can be found on Marc Zeitlan's site:
http://cozybuilders.org/newsletters/
Updates to M drawings:
http://cozybuilders.org/cad_files/Cozy_MKIV_M-Sup_1.2_Draft.pdf
Chapter 13 - access clearance for nose gear bolt
Vance suggested removing foam to make clearance if/when the nose gear pivot bolt needs to be removed. Otherwise, will need to drill a hole in the side if this needs to be removed later. Some flox and BID patched the pocket.

Chapter 13 - Landing Brake hidden screw mod
 |
| The screw heads were ground flat, notched and recessed similar to the hinge and rudder screws replaced by click bonds. The regular click bonds shafts weren't long enough. |
Chapter 23 - Engine Selection - Prop strike engines - no bueno
In December 2015, flying back from Rusk over Joe Pool Lake at night, I was in the right seat in my friend Don's Comanche, the plane started shaking bad. We were at 2500' and had just gotten clearance into Arlington's airspace moments before. Don declared an emergency and the pattern was cleared. We were SO lucky to be able to turn final and land. This engine had about 250 hours SMOH from a prop strike/belly landing 10 years earlier. It had been inspected and rebuilt by one of the largest, "most reputable" shops in the USA. The crank, cam, 5 accessory gears and one jug had to be replaced on this O-540.
Prop strike - "dials zero" engines listed for sale did not get my consideration after this event.
 Based on experiences of folks with years of good and bad experiences, and encouragement from some folks that seem to like me, decided to get a new engine.
Update - after about 50 hours including a trip to OSH, this O-540 was rebuilt, there was a Lycoming AD on the wrist pin bushings (the only Lycoming part that was used in this major overhaul). One was defective and had to be replaced.

Prop strike - "dials zero" engines listed for sale did not get my consideration after this event.

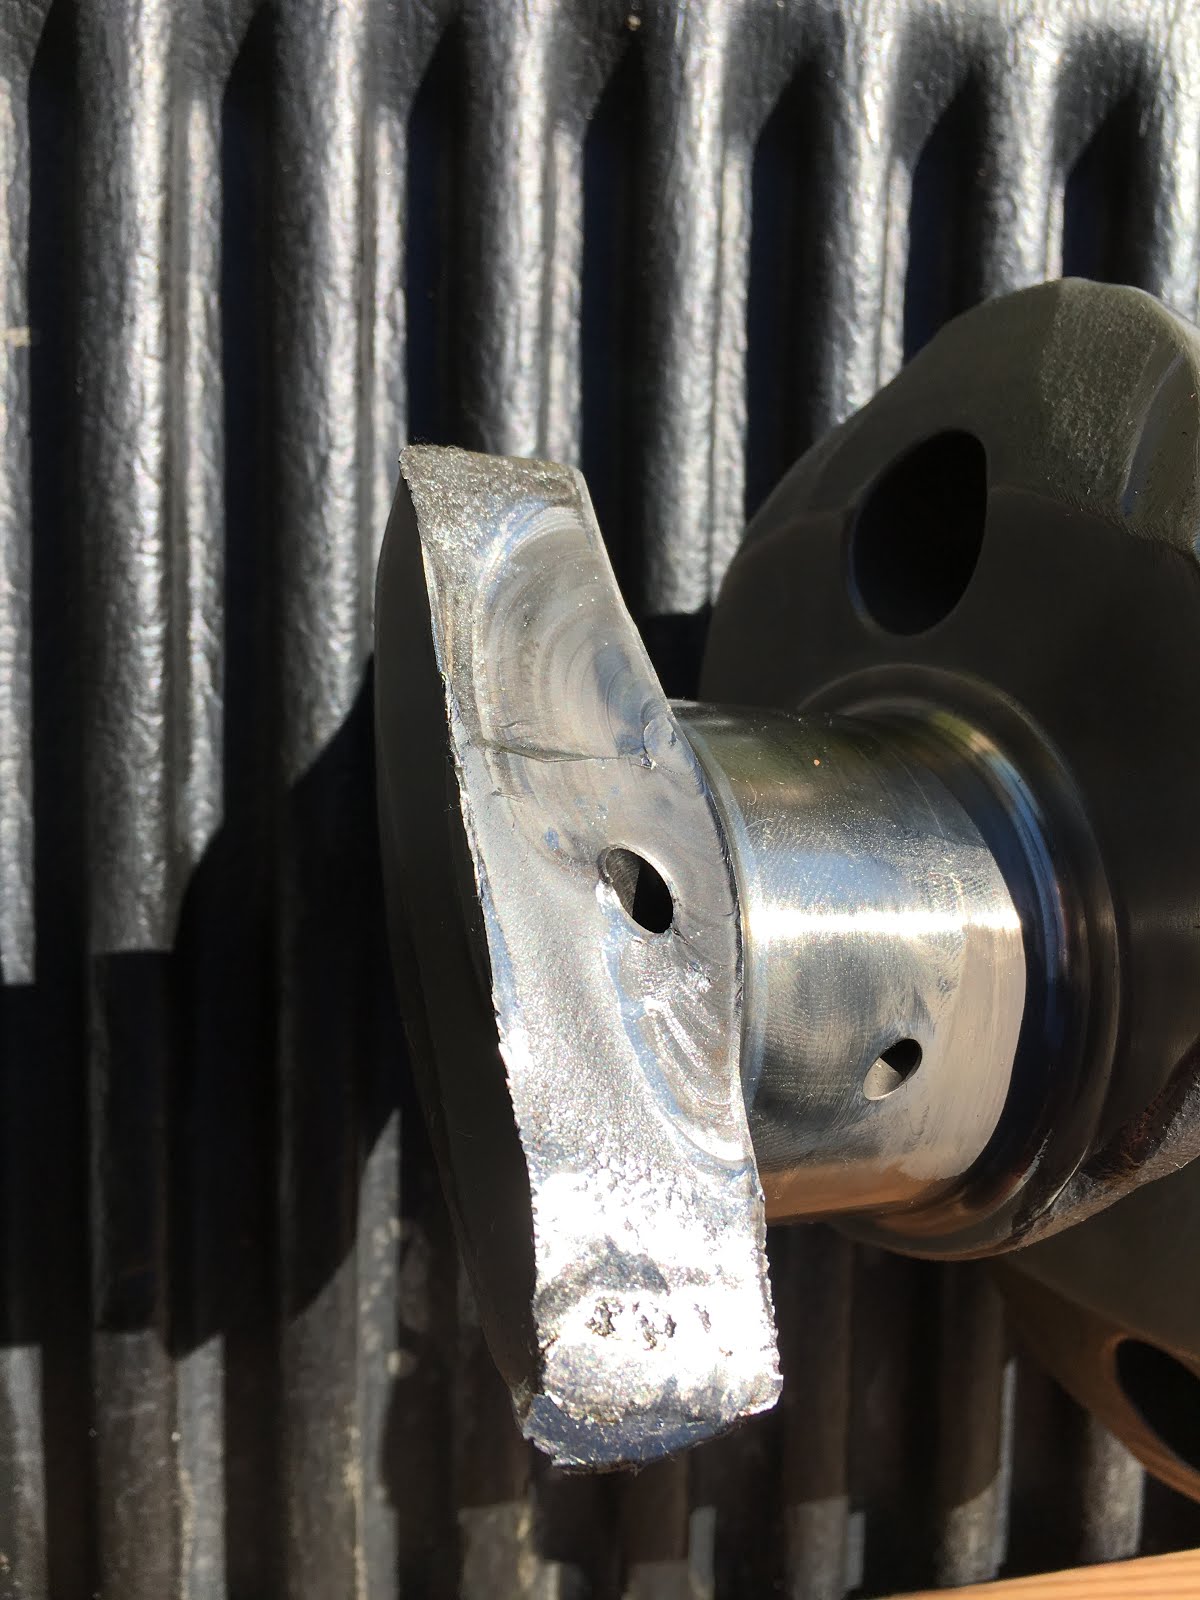
Update - after about 50 hours including a trip to OSH, this O-540 was rebuilt, there was a Lycoming AD on the wrist pin bushings (the only Lycoming part that was used in this major overhaul). One was defective and had to be replaced.

Sunday, September 24, 2017
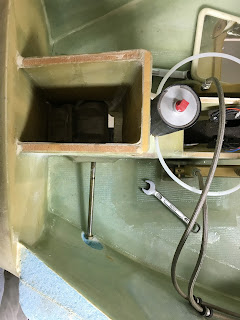
Chapter 21 - Fuel probes
I had some of Nick's earlier probes that required larger holes to be drilled at the top to help avoid getting clogged with flox. Instructions are on his web site.
 |
 |
| Princeton modules interface with the probes. |
 |
| Decided after cutting the first hole that it wasn't the best location. |
 |
| I used a long skinny small drill bit to make the hole for the probe wire and used safety wire to pull the probe wire through. |

Subscribe to:
Posts (Atom)